 05-28-2012, 12:30 AM
|
#21
|
|
Premier V.I.P. Member
Join Date: Feb 2009
Location: Oxbow SK
Posts: 1,385
|
mine fit in. the bushings were a real bastard though. just took lots of wiggling and squeezing
__________________
2002 Alero w/ 2.2 ecotec 5 speed
power window conversion, heated leather seats, 16" rims, high & low hids, auto dimming rear mirror, speedbuilt front and rear sway bars, poly bushings all around.
2005 Silverado 2500HD w/ 6.0l Vortec 4L80E
Tuned 6.0l, exhaust, intake, with 450000km on the odometer. Tow Rig
1985 Pontiac Trans Am GTA w/ 5.7 Vortec 700r4
mild vortec 350 with 4 speed auto. performance suspension. factory gold color. project car
|

|

|
 05-28-2012, 02:29 AM
|
#22
|
|
GX Member
Join Date: Mar 2012
Location: North Carolina
Posts: 179
|
If you put the end links in first then the bar should pretty much line itself up where the bushings go. As I said on your post over on GAO, the new bushings are a bit taller than stock, but the grease able Energy Suspension bushings I bought are the same height as stock.
|

|

|
 05-28-2012, 02:51 AM
|
#23
|
|
GX Member
Join Date: Feb 2012
Location: Marysville, WA
Posts: 14
|
Yeah, I failed and grabbed random sized ES regreasables not realizing that the bracket would be a different size, so now I'm stuck with 2 sets of bushings I can't use or sell.... at least i got them for cheap. Anyone have a size for the bars? I still haven't seen anything about that.
I put the bar on the links, this did not help any, the bar still needed to move forward a bunch for the bushing bracket to fit in the slit, and then it wouldn't fit in correctly. I even had someone hold the other end while messing with one side.
__________________
Corvette Brake Upgrade
SC/T Package
2.5" Cat-Back exhaust w/ 30" Magnaflow Resonator
Last edited by PJGrandAm : 05-28-2012 at 02:54 AM.
|

|

|
 05-29-2012, 09:07 AM
|
#24
|
|
GX Member
Join Date: Mar 2012
Location: North Carolina
Posts: 179
|
A few of my front swaybar install pictures....
I hope these pictures are of some value to anyone who bought the new swaybars and are deciding if they want to tackle this job themselves or not. It's not overly difficult but does require some time and patience along with a few bruised knuckles and bumps on the head.  It can be dangerous if you're a novice mechanic and don't really know what you're doing so seek out an experienced helper if you're unsure of your mechanical abilities.
The installed swaybar in place....1999 Pontiac Grand AM SE
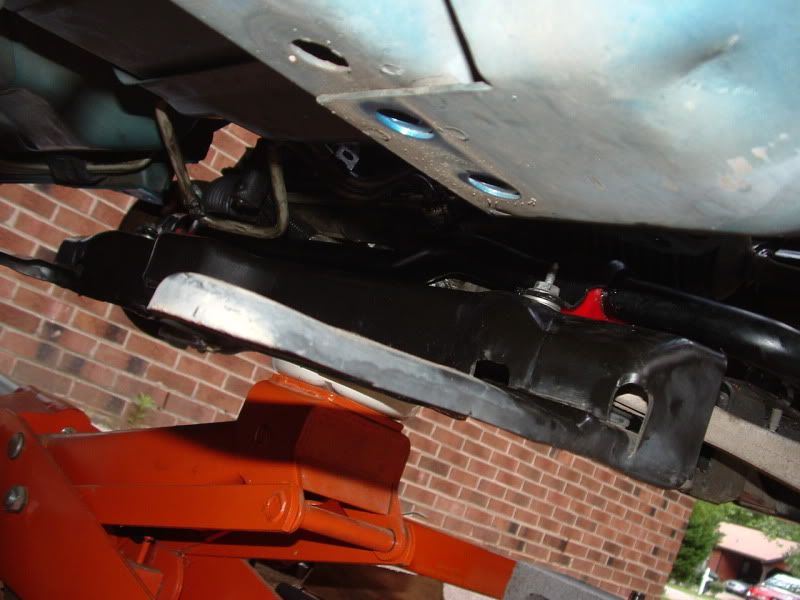
Passenger side view...I used the bushings sent with the bars and the stock brackets. I tried installing Energy Suspension greaseable bushings but the supplied brackets simply would not mount correctly even with modifications.
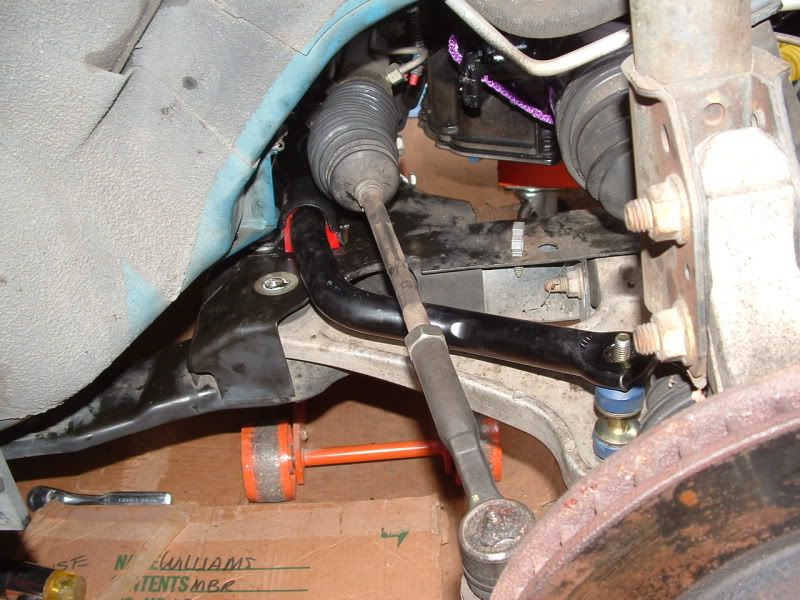
Driver's side view....I'm still struggling trying to get the new endlinks installed.
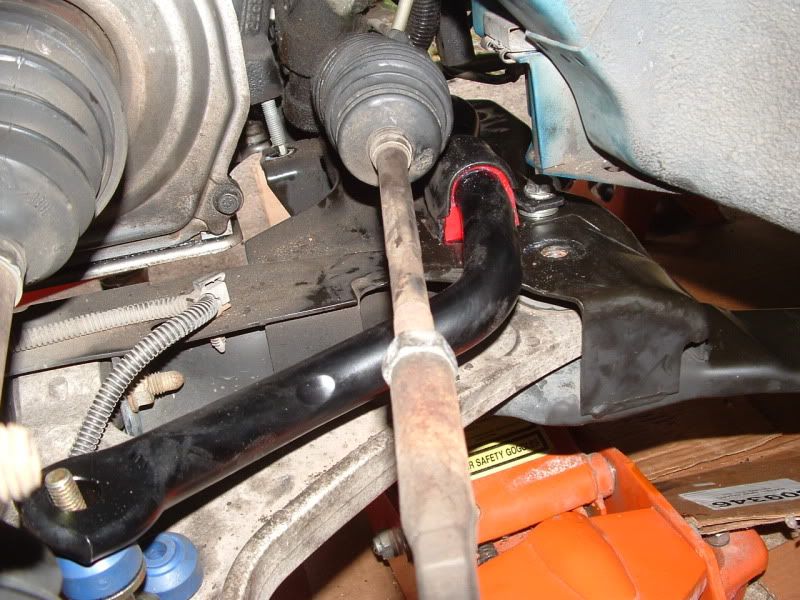
I ended up putting a few shim washers under the stock brackets on each side to account for the extra swaybar thickness over stock because the bracket bolts would never bottom out on the subframe like stock with these bars and I wanted the bolts to be rock solid tight.
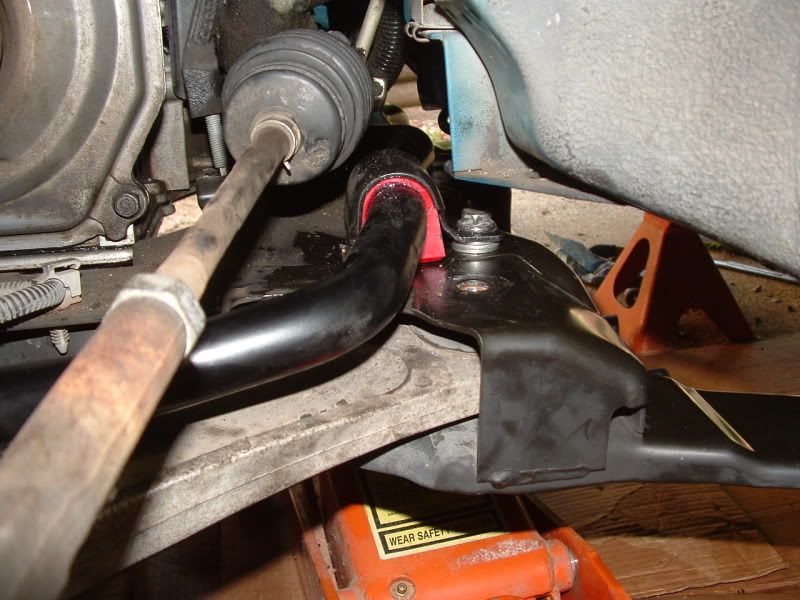
Better view of installed bar.....
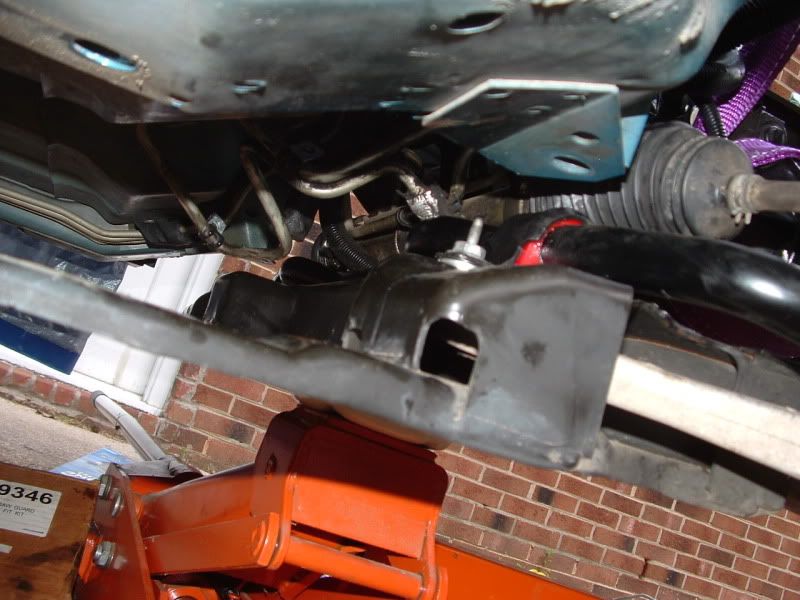
A few other tidbits....I highly recommend removing the intermediate steering shaft from the steering rack before dropping the subframe. Simply lift up the rubber boot and remove the pinch bolt, then push the intermediate steering shaft up and off the stub on the steering rack. Sorry I did not take a picture of that, but it's real simple although working space is a bit tight in that area.
Finally, my car does not currently have an engine installed because I'm in the process of doing a 3500 engine swap, so I attached my engine hoist to the transmission to hold it up while I loosened the trans mounts and lowered the subframe. I hope to drop the 3500 engine in next weekend weather permitting and will install the new rear swaybar after the engine is installed. |

|

|
 05-29-2012, 02:03 PM
|
#25
|
|
GX Member
Join Date: Feb 2012
Location: Marysville, WA
Posts: 14
|
That is nice that you didn't have an engine, you have a couple more inches than I do to work on the brackets. The tops of my brackets keep hitting the cabin frame when trying to install.
Your bar also looks like it is set straight in the bracket, you wouldn't happen to have a pic of your bar pre-install? The part where mine mounts is in an awkward angle compared to the rotational axis. (see above pictures. I compared the bar to stock, and that section is definitely at a different angle than stock. I am about to delve back into installing the bar anyways. I figure I should be able to at least get one mount bolted down and then bend the bar back to bolt the other bracket down.
__________________
Corvette Brake Upgrade
SC/T Package
2.5" Cat-Back exhaust w/ 30" Magnaflow Resonator
Last edited by PJGrandAm : 05-29-2012 at 02:05 PM.
|

|

|
 05-29-2012, 02:11 PM
|
#26
|
|
Premier V.I.P. Member
Join Date: Sep 2010
Location: Howard, KS
Posts: 1,848
|
Quote:
Originally Posted by PJGrandAm

That is nice that you didn't have an engine, you have a couple more inches than I do to work on the brackets. The tops of my brackets keep hitting the cabin frame when trying to install.
Your bar also looks like it is set straight in the bracket, you wouldn't happen to have a pic of your bar pre-install? The part where mine mounts is in an awkward angle compared to the rotational axis. (see above pictures. I compared the bar to stock, and that section is definitely at a different angle than stock. I am about to delve back into installing the bar anyways. I figure I should be able to at least get one mount bolted down and then bend the bar back to bolt the other bracket down.
|
front bar

__________________
2004 Audi TT Quattro 1.8t 
1969 Chevrolet Biscayne 2d
1963 VW Beetle
|

|

|
 05-29-2012, 04:14 PM
|
#27
|
|
GX Member
Join Date: Feb 2012
Location: Marysville, WA
Posts: 14
|
Well with a ton of elbow grease, I was able to get the bar in. I'm afraid the bar might be messed up though. It definitely doesn't sit even close to straight in the bushings. I don't know whether to try and pull the passenger side bushing out and mount it the correct way or not because it was so gnarly trying to get the bar in. Mine definitely doesn't settle the way yours does.
__________________
Corvette Brake Upgrade
SC/T Package
2.5" Cat-Back exhaust w/ 30" Magnaflow Resonator
|

|

|
 05-29-2012, 05:26 PM
|
#28
|
|
GX Member
Join Date: Feb 2012
Location: Marysville, WA
Posts: 14
|
So I put my new endlinks in, i stripped the old ones when hitting the bolt with the hammer. I sprayed some brake cleaner (that stuff works on everything) and hammered the heck out of it until they came out. The energy suspension spacer is a mm or two longer than stock, so I decided to reuse the stock spacer by boring it out and cutting the tabs.
I have a new problem. I cant get my rear trans mount bolts to line up with the subframe holes..... I'm looking into maybe putting a board under my trans and jacking it up, then jacking the subframe up? Figured I would keep up to date with you guys.
__________________
Corvette Brake Upgrade
SC/T Package
2.5" Cat-Back exhaust w/ 30" Magnaflow Resonator
Last edited by PJGrandAm : 05-29-2012 at 05:28 PM.
|

|

|
 05-29-2012, 05:39 PM
|
#29
|
|
Premier V.I.P. Member
Join Date: Dec 2009
Location: New Hampshire
Posts: 1,979
|
good idea to be putting some assembly grease (for those of you using non-greasable bushings) inside the bushings where the bars contact and a thin coat on the outside where the bracket contacts. help against wear and tear/assembly/ and noise.
__________________
The dumbass that shows up randomly 10 years after selling the car.
|

|

|
 05-29-2012, 06:13 PM
|
#30
|
|
GX Member
Join Date: Feb 2012
Location: Marysville, WA
Posts: 14
|
OH MY GOD YES!!!!!! Time to do the rear. I wasn't aware that rear transmission mount could move, I was able to position it correctly and then re-lift the subframe. It handles so good I almost don't even want to do the rear bar, I'm afraid of the pure sex that will ensue afterwards.
__________________
Corvette Brake Upgrade
SC/T Package
2.5" Cat-Back exhaust w/ 30" Magnaflow Resonator
|

|

|
 05-29-2012, 06:24 PM
|
#31
|
|
|
Quote:
Originally Posted by PJGrandAm

...... It handles so good I almost don't even want to do the rear bar,
|
Yes, you do want to install the rear bar.
We'll hear no more of this nonsense. |
|
|

|
 05-29-2012, 06:34 PM
|
#32
|
|
GX Member
Join Date: Mar 2012
Location: North Carolina
Posts: 179
|
Quote:
Originally Posted by a.graham52

good idea to be putting some assembly grease (for those of you using non-greasable bushings) inside the bushings where the bars contact and a thin coat on the outside where the bracket contacts. help against wear and tear/assembly/ and noise.
|
I used whatever grease PFYC sent with the bars. I did purchase Energy Suspension grease-able bushings and while the bushings themselves fit great, I simply could not get the supplied brackets to work right for this application. Too bad Energy Suspension doesn't make vehicle specific brackets instead of taking the more generic one size fits all approach. |

|

|
 05-30-2012, 12:16 AM
|
#33
|
|
GX Member
Join Date: Feb 2012
Location: Marysville, WA
Posts: 14
|
Sorry I didn't get back sooner, had to go test out the GA. Anyone have any ideas on how to clean human body fluids out of the interior? If I have got these a long time ago, I probably would have waited longer to buy my AGX's and Eibachs.
This is an amazing upgrade from stock with all polyurethane bushings and well worth the money. There is absolutely no nose dive taking corners any more. I haven't had any problem with the rear wanting to come out, and the suspension is fairly neutral which is nice. I haven't noticed any luxury hit with the polyurethane and stiffer bar, everything feels more solid now too which is a big plus. I can't wait to see how the car acts with the AGX, Eibachs and Grand Prix lateral arms.
Thanks a bunch for the write-up 03sleepr, it helped a bunch.
+rep
__________________
Corvette Brake Upgrade
SC/T Package
2.5" Cat-Back exhaust w/ 30" Magnaflow Resonator
|

|

|
 05-30-2012, 02:24 AM
|
#34
|
|
3500 DONE!
Join Date: Apr 2006
Location: Albany, NY
Posts: 5,915
|
I'm getting anxious to get these damn bars on.....all these good reviews makes me excited! I have the bars/strut mounts and hubs all in my back seat. Gonna do the hubs and rear brakes this weekend.
__________________
2002 3400 & 3500 GL "Ruby"-->R.I.P. 163k. My first car. Put 130k on her.
2000 3500 GLS "Robin"-->Intake,Headers,Exhaust,H&R springs,KYB AGX,Sway bars,Strut bars and more 
|

|

|
 05-30-2012, 02:27 AM
|
#35
|
|
Premier V.I.P. Member
Join Date: Sep 2010
Location: Howard, KS
Posts: 1,848
|
Quote:
Originally Posted by PJGrandAm

Thanks a bunch for the write-up 03sleepr, it helped a bunch.
+rep
|
no problem! I enjoyed making it, it also helped so I didn't rush through the install. thanks!
Quote:
Originally Posted by billytheman1188

I'm getting anxious to get these damn bars on.....all these good reviews makes me excited! I have the bars/strut mounts and hubs all in my back seat. Gonna do the hubs and rear brakes this weekend.
|
hurry up and get them on!
__________________
2004 Audi TT Quattro 1.8t 
1969 Chevrolet Biscayne 2d
1963 VW Beetle
Last edited by 03Sleepr : 05-30-2012 at 03:51 AM.
Reason: catn speel
|

|

|
 05-30-2012, 07:26 PM
|
#36
|
|
GL Member
Join Date: Aug 2005
Location: Grafenberg, Germany
Posts: 826
|
ok, can somebody tell me what kind of swaybar you all are installing?
What are the technical specs?
otherwise, so far it looks pretty good. And good to know how far I can lower the K-Member, cause my chassis points there are really rusting out 
__________________
Thanks Julian
1979 350SB Chevrolet Camaro Project Thread
1995 Chrysler Stratus LX
1999 3.4L Oldsmobile Alero ( resource page)
2002 Nissan Primera with CVT
|

|

|
 05-31-2012, 09:40 PM
|
#37
|
|
GX Member
Join Date: Feb 2012
Location: Marysville, WA
Posts: 14
|
Well when I loosened the front bolts and took out the 3 rear bolts on either side, as well as the 3 rear trans mount bolts, the frame lowered about 3-4 inches. The stock bar was harder to get out of there than the Speedbuilt bar from PFYC. The only trouble is the brackets, at least on my bar, the others' bars look like they fit fine.... I needed another set of hands to get the last bracket on, I recommend starting with the passenger side.
I'm pretty sure the front bar is roughly 26mm (If i had to guess, 26.8) and rear is roughly 22mm (22.2)
The biggest difference from stock (that you will notice) is not better handling, but better weight shifting when cornering. The car rolls more sideways than forward now (as well as much less roll), which allows better traction as the weight distributes more evenly on the tires. Don't be mistaken for elimination of G-forces, I definitely feel these much more  . This is because your body no longer wants to fall out of the car so much as slide out. I must say the handling has improved quite a bit though, the stiffer rear bar definitely helps with the turns.
__________________
Corvette Brake Upgrade
SC/T Package
2.5" Cat-Back exhaust w/ 30" Magnaflow Resonator
Last edited by PJGrandAm : 05-31-2012 at 09:45 PM.
|

|

|
 06-15-2012, 05:00 PM
|
#38
|
|
GL Member
Join Date: Jun 2005
Location: Saskatchewan
Posts: 644
|
Is the bar supposed to curve upwards or downwards? If mine curves downwards it touches the edge of the subframe beside the brackets. I took a little bit off the bottom of the bushings because there was no way they were going on with the stock brackets. I only took less than a 1/4" off the bottom, that shouldn't have lowered it enough to bottom out, right?
__________________

|

|

|
 06-16-2012, 10:50 AM
|
#39
|
|
GX Member
Join Date: Mar 2012
Location: North Carolina
Posts: 179
|
Quote:
Originally Posted by mrmike

Is the bar supposed to curve upwards or downwards? If mine curves downwards it touches the edge of the subframe beside the brackets. I took a little bit off the bottom of the bushings because there was no way they were going on with the stock brackets. I only took less than a 1/4" off the bottom, that shouldn't have lowered it enough to bottom out, right?
|
The bar ends should curl upwards at the endlinks. See the pictures I posted earlier. The stock brackets will fit the new bushings, however the brackets won't bottom out against the subframe when bolted down due to the extra thickness of the new swaybar. I shimmed mine with a few washers so the bracket bolts could be securely tightened down as seen in the photos.
I finally got the new Moog endlink bushings installed, but I had to use the spacers from the old stock endlinks in order to get them to fit. |

|

|
 06-16-2012, 12:13 PM
|
#40
|
|
GX Member
Join Date: Feb 2012
Location: Marysville, WA
Posts: 14
|
Quote:
Originally Posted by mrmike

Is the bar supposed to curve upwards or downwards? If mine curves downwards it touches the edge of the subframe beside the brackets. I took a little bit off the bottom of the bushings because there was no way they were going on with the stock brackets. I only took less than a 1/4" off the bottom, that shouldn't have lowered it enough to bottom out, right?
|
I have a clunking on my right side that I haven't figured out, I also cut my bushings. I wonder if this is what is happening, it is already decently close to tapping the control arm.
Quote:
Originally Posted by Starglow

The stock brackets will fit the new bushings, however the brackets won't bottom out against the subframe when bolted down due to the extra thickness of the new swaybar. I shimmed mine with a few washers so the bracket bolts could be securely tightened down as seen in the photos.
|
Semi-true; the reason it won't bottom out is because of the extra height of the bushing, which is because the bar is fatter. Even with the bar bigger, they could've supplied bushings that would fit perfect, I am starting to think there is a reason they are taller. I think I might go back and take the brackets off one day and put the washers in like you did. I just dread that day with a passion. 
__________________
Corvette Brake Upgrade
SC/T Package
2.5" Cat-Back exhaust w/ 30" Magnaflow Resonator
|

|

|
|
Currently Active Users Viewing This Thread: 1 (0 members and 1 guests)
|
|
|
| Thread Tools |
Search this Thread |
|
|
|
| Display Modes |
 Linear Mode Linear Mode
|
 Posting Rules
|
You may not post new threads
You may not post replies
You may not post attachments
You may not edit your posts
HTML code is Off
|
|
|
All times are GMT -4. The time now is 07:33 AM.
|